

Stop an AC Indoor Unit Leak Before It Damages Your Home
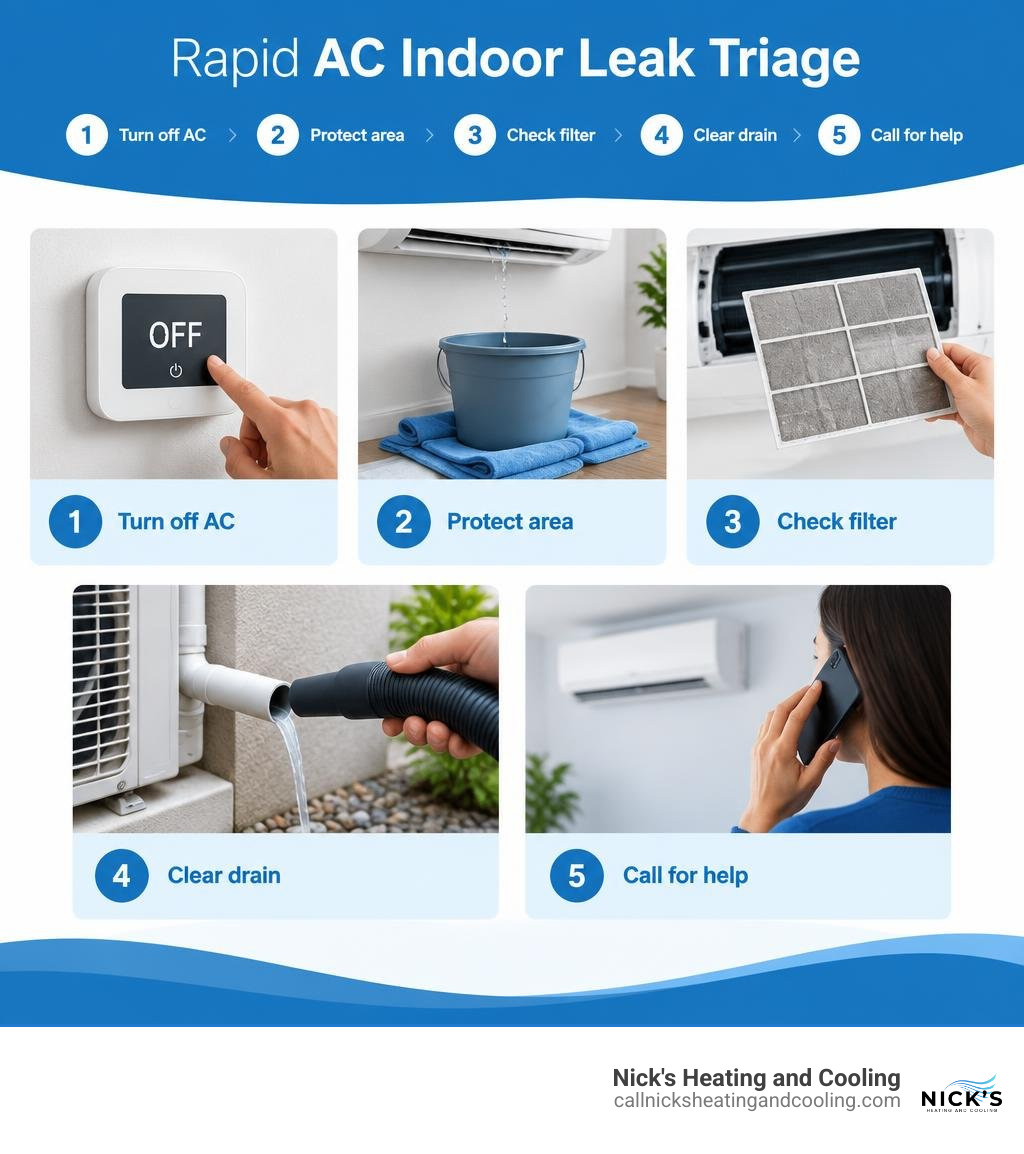
If your AC indoor unit is leaking water, turn the thermostat to Off right away, place towels or a bucket under the drip, and keep water away from outlets, wiring, or the furnace/air handler. Then check the air filter and look for a blocked condensate drain line. A clogged drain is the most common cause, and a wet/dry vacuum can often clear it from the outdoor drain outlet.
Do not keep running an AC that is actively leaking indoors. What starts as a small puddle can soak drywall, flooring, or ceilings. Mold can begin growing on wet drywall within 24 to 48 hours.
Your AC is supposed to pull moisture from Birmingham’s humid air and send that water safely outside. When the drain line clogs, the coil freezes, or a pan or pump fails, that water has nowhere to go but into your home.
Common Causes of an AC Indoor Unit Leaking Water
During hot, muggy days in central Alabama, your cooling system doubles as a high-capacity dehumidifier. A residential unit can easily extract between 10 and 20 gallons of water per day right out of the air. When everything works properly, that condensation gathers on the cold evaporator coil, drips down into an internal collection pan, and travels through a dedicated PVC pipe to exit outdoors.
If any section of that pathway gets blocked or broken, water rapidly overflows into your living spaces. Sometimes, issues arise not from the main drain pan but from sweating air con pipes dripping through uninsulated sections of refrigerant line.
| Leak Cause | Common Symptoms | Urgency Level | Recommended Action |
|---|---|---|---|
| Clogged Drain Line | Water overflowing from the drain pan; gurgling noises; standing water near indoor base. | Moderate to High | Shut down system; vacuum line from outside; flush with distilled white vinegar. |
| Frozen Evaporator Coil | Visible ice on copper tubes or coil fins; reduced airflow; leak increases when system stops. | High | Turn system to Fan Only to melt ice; inspect and replace air filter; check refrigerant. |
| Cracked Drain Pan | Constant dripping beneath older air handlers; water leaking despite a clear drain pipe. | High | Shut off unit; inspect pan for hairline cracks or rust holes; replace pan. |
| Failed Condensate Pump | Water backing up in basement or closet setups; pump humming continuously or totally silent. | High | Check pump power supply; clean float mechanism; replace faulty pump assembly. |
| Damaged Pipe Insulation | Steady condensation dripping down drywall along copper line sets; wet ceiling patches. | Low to Moderate | Inspect insulation jacket; re-wrap exposed copper lines with closed-cell foam tape. |
Clogged Condensate Drain Lines: Why Your AC Indoor Unit Leaking Water Happens Most Often
A clogged condensate drain line accounts for roughly 60% of all residential leak calls. In fact, field data shows that around 70% of stubborn drainage backups trace back to a thick buildup of algae, dust, and microbial biofilm inside the pipe.
Dark, damp PVC pipes create an ideal environment for slime to form. When dirt slips past a subpar air filter, it binds with standing water in the drain pan, producing a thick sludge that chokes the narrow drain opening. Once blocked, the pan fills up in minutes, spilling gallons of dirty water straight into your floorboards, closets, or ceilings. To better understand how drainage bottlenecks differ from mechanical failures, you can consult this AC drain diagnostics guide.
Frozen Evaporator Coils and Airflow Restrictions
A frozen evaporator coil accounts for approximately 25% of leak calls. When warm indoor air cannot move across the coil, the refrigerant inside drops below freezing. Moisture condensing on the coil freezes solid into a thick block of ice.
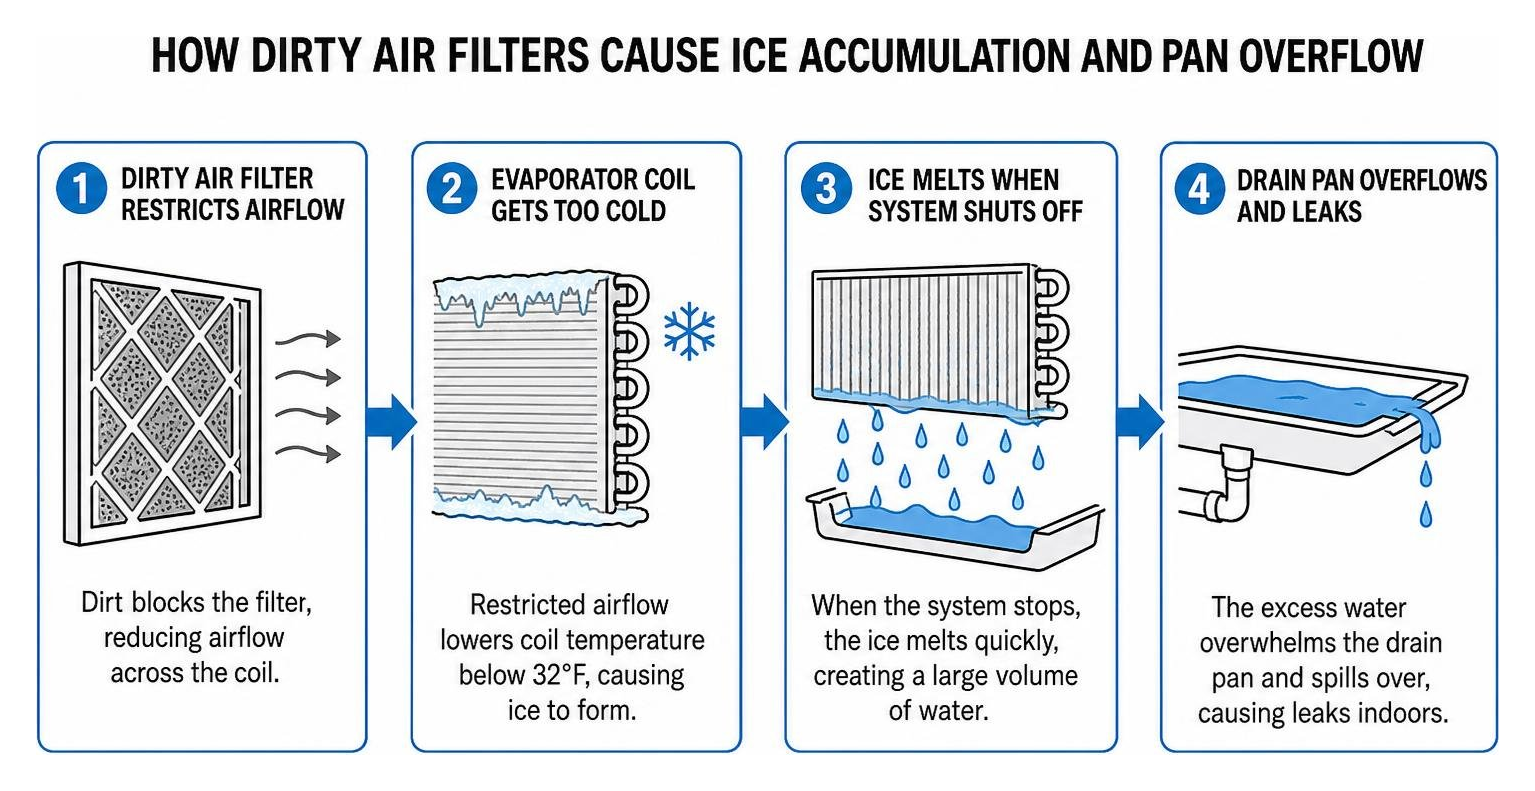
When the thermostat eventually turns off or the system trips, that large block of ice melts rapidly. The sheer volume of melting ice overwhelms the drain pan, spilling over the edges.
The two primary triggers behind a frozen coil are:
- Severe Airflow Restriction: A clogged, dirty filter or blocked return grilles starve the system of heat. Maintaining clean filters and improving indoor air quality protects your equipment while keeping your home comfortable.
- Low Refrigerant: Pinhole leaks cause low operating pressure, dropping coil temperatures below 32°F.
Damaged Drain Pans and Condensate Pump Failures
Accounting for the remaining 15% of leak calls are failed mechanical components, including cracked drain pans and broken condensate pumps.
Older air handlers often feature galvanized steel drain pans that rust through over years of water exposure. Newer systems utilize plastic pans that can crack if fittings are over-tightened or damaged during maintenance.
If your air handler sits in a basement or an interior closet where gravity cannot drain the water outside, your system relies on an electric condensate pump. When the internal float switch sticks, the check valve clogs, or the small motor burns out, water rapidly backs up and spills over the reservoir.
Flushing the Drain Line and Clearing Biofilm
Once you have cleared the primary clog from the outside, head back inside to flush the line and eliminate remaining bacteria.
- Locate the T-shaped PVC cleanout port on the drain line near your indoor air handler. Remove the unglued cap.
- Pour 1 to 2 cups of distilled white vinegar slowly into the cleanout port.
- Allow the vinegar to sit in the trap for 30 minutes to break down residual biofilm and algae.
- Flush the line by slowly pouring 2 cups of warm (not boiling) tap water down the cleanout.
- Walk outside to confirm that the water is flowing freely from the exterior PVC pipe. Replace the PVC cleanout cap securely.
Pro-Tip: Never pour chlorine bleach into your condensate line if you have an aluminum evaporator coil or flexible plastic drain connections. Bleach fumes can corrode modern aluminum coils and degrade plastic fittings over time.
Inspecting Air Filters and Thawing Frozen Coils
If you notice ice on the copper lines or drain pan:
- Turn your thermostat to OFF and switch the fan setting to ON (Fan Only mode). This circulates ambient indoor air over the coil to thaw the ice without running the compressor.
- Remove your air filter. If the surface is coated in gray dust, hair, or pet dander, discard it and install a fresh, properly sized replacement.
- Keep buckets or thick towels beneath the indoor unit while the coil thaws to catch water that misses the drain pan.
- Allow the coil to defrost completely (this typically takes 1 to 3 hours).
- Once the coil is dry and the filter is replaced, switch the thermostat back to COOL. If ice begins reforming on the coil within 30 to 60 minutes, you likely have low refrigerant and need professional assistance.
When to Call a Professional for AC Water Leaks
While simple clogs and dirty filters can be handled on your own, certain situations require the diagnostic tools and training of an experienced HVAC technician.
You should call a certified professional immediately if:
- The Leak Involves an Attic Unit: An attic air handler leak can quickly soak through insulation and cause ceiling collapses.
- Water is Dripping Near Electrical Components: Moisture inside the control board, circuit breaker, or transformer creates immediate short-circuit and fire risks.
- The Drain Pan is Cracked or Rusted: Replacing a primary drain pan often requires detaching the evaporator coil, which involves handling high-pressure refrigerant lines.
- Ice Reappears After Changing the Filter: Recurring ice indicates a refrigerant leak or failing blower motor, both of which require professional diagnostic gauges and EPA-certified handling.
- The Drain Line Remains Clogged: Hard clogs deep inside concealed walls may require specialized high-pressure CO2 flush guns or motorized snakes.
Working with trusted pros ensures your equipment is repaired safely according to manufacturer specifications. Learn what to look for when choosing a certified HVAC contractor to protect your investment, and review this comprehensive study on AC leakage causes and fixes for further technical background.
2026 Repair Costs and Diagnostic Expectations
Understanding typical industry pricing helps you plan for unexpected HVAC repairs in 2026:
- Basic Drain Clearing & Diagnostic Visit: Expect standard service calls to clear a drain line with pressurized nitrogen or specialized vacuums to run between $150 and $300.
- Condensate Pump Replacement: Replacing a burned-out condensate pump typically ranges from $250 to $450, including parts and labor.
- Safety Float Switch Installation: Adding an emergency overflow shutoff switch to your drain line generally costs $125 to $225.
- Drain Pan Replacement: Replacing a cracked primary or secondary pan ranges from $400 to $900, depending on how accessible the indoor unit is.
- Refrigerant Leak Detection and Repair: Locating a coil leak, repairing the copper tubing, pulling a vacuum, and recharging refrigerant can range from $500 to $1,800+, depending on the size of your unit and the refrigerant type used.
How to Prevent Future Indoor AC Water Leaks
Preventing water leaks is significantly cheaper and easier than repairing water-damaged floors, ruined ceilings, and mold-covered drywall.
- Flush the Drain Monthly: Pour one cup of plain distilled white vinegar into your PVC cleanout port once a month during the cooling season. This stops biofilm and algae before they can create a stubborn clog.
- Replace Air Filters Regularly: Check 1-inch pleated filters every 30 days and replace them as soon as dust builds up. Never run your system with a visibly dirty filter.
- Install a Safety Float Switch: A float switch sits inside your drain pan or primary line. If water rises due to a blockage, the switch instantly cuts power to the AC, stopping water production before it overflows.
- Inspect Suction Line Insulation: Periodically check the black foam insulation wrapping the thick copper pipe entering your air handler. If the foam is degraded or torn, water will condense on the bare metal and drip continuously.
- Schedule Annual Preventative Maintenance: A seasonal tune-up gives a technician the chance to chemically clean your evaporator coil, flush the drainage system, test the safety switches, and verify refrigerant pressures. Discover why routine HVAC maintenance is essential for extending equipment lifespan and avoiding emergency repairs.
Frequently Asked Questions About AC Leaks
Is an AC indoor unit leaking water dangerous if left unaddressed?
Yes. Beyond causing costly structural damage to subfloors and ceilings, pooled water creates an ideal environment for toxic mold and mildew within 24 to 48 hours. If water reaches internal electrical connections, it can short out circuit boards, blow transformers, or create a serious fire hazard.
Can I run my air conditioner while it is actively leaking?
No, you should never run your air conditioner while it is actively leaking indoors. Continuing to run the system will generate 10 to 20 gallons of additional condensate each day, worsening water damage and risking electrical short circuits. Turn the thermostat to OFF until the clog is cleared or repaired.
Why does my AC leak water only after turning it off?
This almost always indicates a frozen evaporator coil. While the system runs, ice remains frozen to the metal fins. The moment the system turns off, the ice begins melting rapidly, creating a rush of water that overwhelms the drain pan and spills over the edges.
Conclusion
An indoor AC leak requires fast action. By shutting down your system immediately, vacuuming out drain line clogs, and swapping out dirty filters, you can solve many common drainage issues yourself in just a few minutes.
However, if your evaporator coil keeps freezing, your drain pan is cracked, or the leak refuses to clear, do not let water sit and threaten your home. When you need dependable assistance, you can count on comprehensive AC repair services from local professionals who put your comfort and safety first.
Nick’s Heating and Cooling currently services Birmingham, Hoover, Vestavia Hills, Mountain Brook, Alabaster, Chelsea, Homewood, Trussville, Pelham, and Irondale for all your HVAC and Heating needs.