

What AC Uninstallation and Installation Really Costs
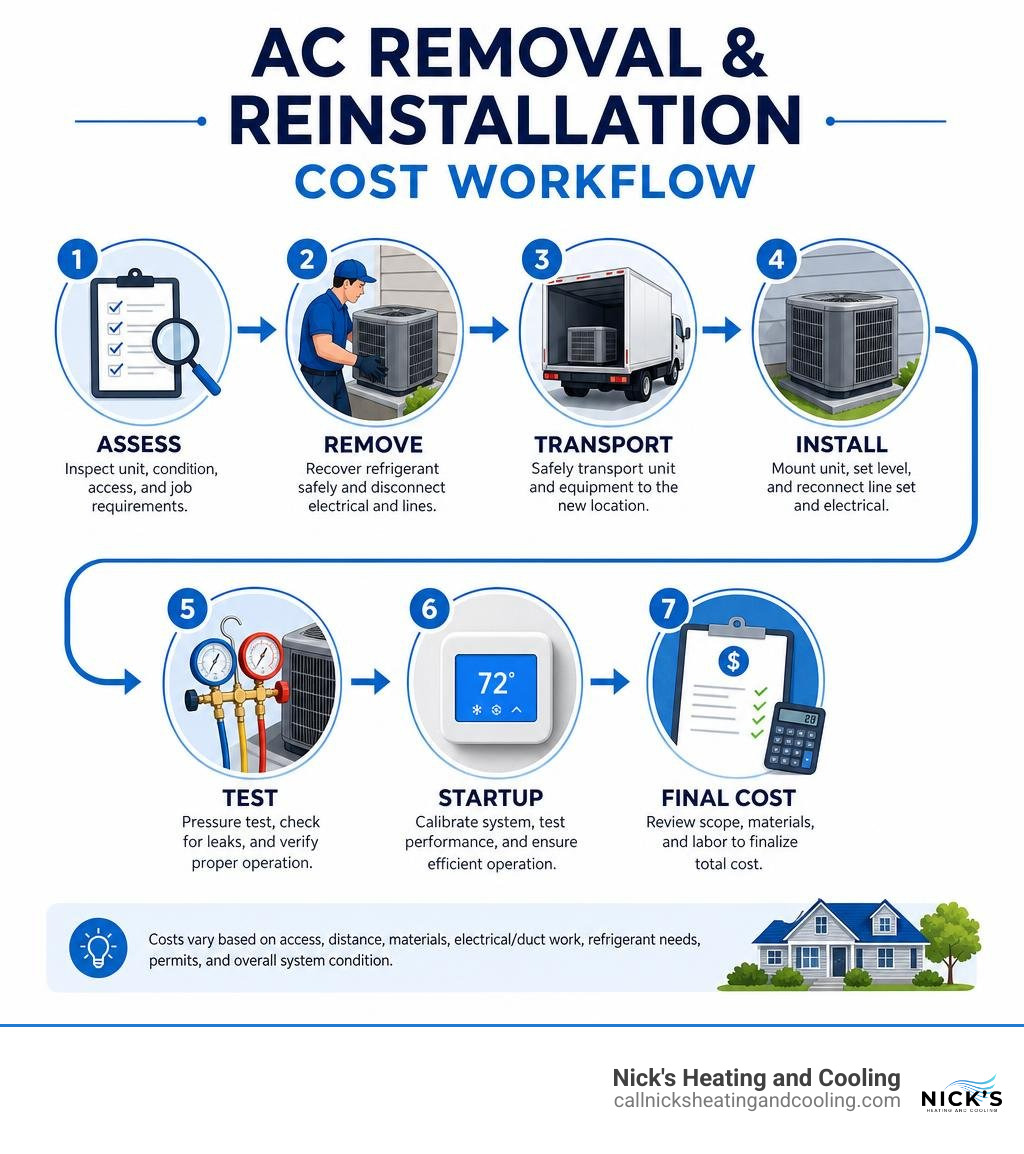
For most Birmingham-area homeowners, AC uninstallation and installation costs depend on whether the existing equipment can be safely reused. A straightforward relocation may involve removal, new mounting, electrical reconnection, pressure testing, and startup. Costs rise when the job needs a new line set, refrigerant recovery or recharge, electrical upgrades, duct changes, permits, or difficult outdoor-unit access.
Before moving an AC, ask a qualified HVAC technician to:
- Inspect the unit’s age, condition, refrigerant type, and capacity.
- Quote removal, transport, reinstallation, materials, and any repair work separately.
- Compare relocation costs with replacing an older or inefficient system.
Moving a working system can make sense during a renovation or room addition. But if it has frequent failures, high power bills, a damaged compressor, or outdated refrigerant, replacement may be the better long-term value. Proper removal and setup also protect the refrigerant circuit, wiring, and manufacturer warranty.
When to Relocate, Repair, or Replace an Aging AC Unit
Whenever a homeowner in Birmingham asks me to pull down an air conditioner to make way for a new deck or home addition, my first step is evaluating whether the existing equipment actually deserves to go back up. An air conditioner’s typical operational lifespan ranges between 10 and 15 years. If your outdoor condenser has already endured over a decade of sweltering Alabama summers, investing several hundred or even thousands of dollars into moving it might be throwing good money after bad.
Modern cooling systems feature Seasonal Energy Efficiency Ratio (SEER2) ratings reaching up to 26, whereas older units often run at efficiency levels below 13 SEER. The energy consumption differences between these generations are massive; running an outdated system can double your monthly electric bills during peak cooling months. When weighing your options, learning about hassle-free cooling system replacement can illuminate how newer inverter technologies dramatically reduce utility expenses compared to struggling legacy models. Taking the time to explore HVAC repair and replacement options gives you a clear financial picture before committing to major equipment handling.
Signs That Indicate Full System Replacement
Relocating an air conditioning unit requires significant physical labor: cutting line sets, pumping down refrigerant, clearing electrical disconnects, and re-establishing system integrity at the new spot. If your system already displays internal damage, the mechanical stress of moving it will likely cause total failure shortly after startup.
Key indicators that you should scrap your old system rather than re-mounting it include:
- Frequent Mechanical Breakdowns: If you are already scheduling timely air conditioning repair multiple times a season for failing contactors, fan motors, or starting capacitors, the system is reaching end-of-life.
- Obsolete Refrigerant (R-22): Systems manufactured before 2010 utilizing R-22 Freon are increasingly expensive to recharge due to regulatory phaseouts. If an R-22 system leaks during uninstallation, sourcing replacement gas is cost-prohibitive.
- Compressor Valve Wear or Acid Contamination: A failing compressor draws excessively high amperage and will not withstand being pumped down and restarted.
- Severe Coil Corrosion: Coils pitted by humidity and debris will often develop pinhole leaks when flexed or moved during relocation.
- Skyrocketing Electric Bills: If your power provider’s kilowatt charges haven’t changed but your monthly summer cooling bill keeps climbing, internal mechanical friction and degraded heat transfer have permanently reduced efficiency.
Sizing and Efficiency Upgrades for Your Home
If you choose replacement over relocation, never assume your existing unit was sized properly in the first place. Many older homes in the Birmingham metro area suffer from oversized units that short-cycle—turning on and off rapidly without running long enough to pull moisture from the humid air.
To determine the ideal capacity, I perform an ACCA Manual J load calculation. This engineering assessment accounts for your home’s total square footage, ceiling height, insulation values, window orientation, and regional climate design conditions. Sizing the unit properly prevents short-cycling, reduces mechanical wear, and maintains balanced indoor humidity.
For home renovations, enclosed patios, or structural additions where extending existing ductwork is impossible or inefficient, considering a ductless cooling system installation can offer targeted zone cooling without the cost of cutting sheet metal through finished walls.
The Complete Guide to AC Uninstallation and Installation Costs
The price of taking down and reinstalling an air conditioning system varies widely based on equipment architecture, refrigerant handling needs, and physical mounting conditions. Below is an overview of standard price ranges for different system configurations:
| System Type | Uninstallation Cost | Reinstallation Labor | New Line Set & Materials | Total Average Cost |
|---|---|---|---|---|
| Standard Central Split System | $250 – $600 | $1,200 – $2,500 | $300 – $800 | $1,750 – $3,900 |
| Single-Zone Ductless Mini-Split | $150 – $400 | $800 – $1,600 | $200 – $500 | $1,150 – $2,500 |
| Multi-Zone Ductless Mini-Split | $300 – $700 | $1,500 – $3,200 | $400 – $1,000 | $2,200 – $4,900 |
| Rooftop / Packaged Heat Pump | $450 – $900 | $1,800 – $3,800 | $350 – $900 | $2,600 – $5,600 |
Typical Price Breakdown for Dismantling and Re-mounting
When quoting an uninstallation and reinstallation project, I separate the job into discrete mechanical stages to give homeowners absolute transparency:
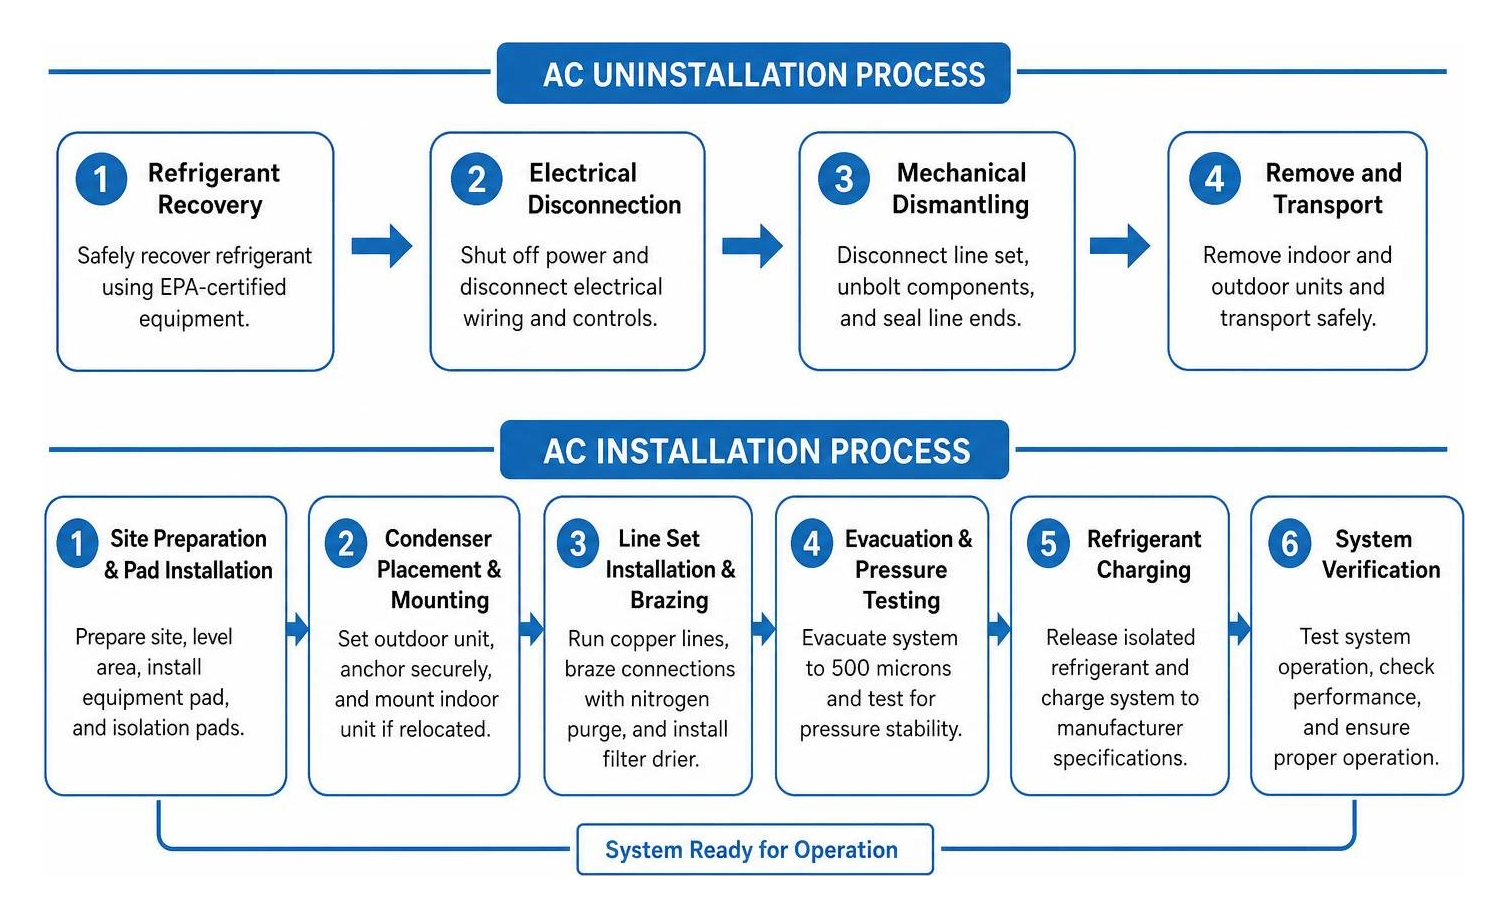
- Refrigerant Recovery or Pump-Down ($150 – $450): Safely isolating or extracting refrigerant into EPA-certified recovery cylinders to ensure none escapes into the atmosphere.
- Mechanical & Electrical Dismantling ($150 – $350): Disconnecting high-voltage whip lines, control wiring, cutting suction/liquid line connections, unbolting mounting hardware, and sealing copper pipe ends.
- Site Preparation & Pad Installation ($100 – $300): Excavating and leveling earth, laying a high-density composite equipment pad, and placing vibration-dampening isolation pads.
- Condenser Placement and Re-mounting ($400 – $900): Setting the outdoor unit, anchoring against wind or vibration, and mounting indoor air handlers or evaporator coils if relocated.
- Line Set Brazing & Filter Drier Installation ($250 – $600): Running new copper lines, purging with dry nitrogen during brazing, and splicing in a mandatory liquid-line filter drier.
- Evacuation, Pressure Testing, & Recharging ($300 – $700): Pulling a deep vacuum down to 500 microns, testing pressure stability, releasing isolated gas, and trimming charge by weight.
Key Factors Influencing AC Uninstallation and Installation Pricing
No two properties present the exact same installation challenges. The primary cost variables include:
- Equipment Accessibility: Ground-level condenser moves are straightforward. However, moving equipment located on steep commercial roofs, tight crawl spaces, or multistory exterior wall brackets requires specialty rigging and safety harnesses, adding labor time.
- Copper Line Set Length: Extending the distance between the outdoor condenser and indoor evaporator coil requires additional copper piping, extra armaflex insulation, and supplemental refrigerant charging calculated per foot.
- Electrical Panel Capacity: Relocating an AC further from the main breaker panel often requires installing a new dedicated disconnect box, running heavy-gauge Romex or conduit, or upgrading breaker amperage to meet current National Electrical Code (NEC) standards.
- Ductwork Modifications: Adjusting an indoor air handler or packaged system requires custom sheet metal transitions to marry the unit’s supply and return plenums to your home’s existing duct trunk lines.
Step-by-Step Technical Guide for System Removal and Setup
Safely unmounting and reinstalling an air conditioner requires adherence to strict mechanical tolerances, thermodynamic principles, and manufacturing standards outlined in factory documentation such as the Technical Air Conditioner Installation Manual.
Step-by-Step AC Uninstallation and Installation Procedures
Executing an AC relocation without compromising the compressor requires a systematic technical workflow:
Phase 1: Safe Uninstallation
- Pre-Service Electrical and Operational Testing: The technician inspects operating suction and discharge pressures, validates compressor winding resistance, and tests system controls.
- Lock-Out/Tag-Out and Power Disconnection: The technician switches off the dedicated circuit breaker at the main electrical panel and pulls the disconnect handle at the outdoor unit, verifying zero voltage with a calibrated multimeter.
- Refrigerant Isolation (Pump-Down): If the unit is functional and uses undamaged service valves, the technician connects manifold gauges, closes the liquid line service valve, runs the compressor until suction pressure drops near zero, and immediately closes the suction valve to trap the charge inside the outdoor condenser coil.
- Disconnecting Lines and Electrical Leads: High-voltage wiring, low-voltage 24V control wires, and copper line sets are uncoupled. The technician immediately caps or braze-seals all open copper stubs with copper caps to prevent ambient moisture and dirt intrusion.
- Physical Unmounting: Fasteners holding the unit to brackets or slabs are removed, and the condenser is lifted safely to prevent fin damage or internal oil migration.
Phase 2: Professional Reinstallation
- Pad Leveling and Clearance Verification: The new composite equipment pad is set level within a 2-degree tolerance on undisturbed or tamped soil, maintaining at least 24 inches of clearance on service panels, 12 inches on rear and side walls, and 48 inches of unobstructed vertical exhaust clearance.
- Vibration Isolation Mounting: The condenser is positioned over neoprene vibration pads to prevent operational hum from transmitting into living spaces.
- Line Set Routing and Brazing: New refrigerant-grade copper tubing is routed without sharp kinks. Liquid line filter driers are installed in the correct flow direction. During brazing, the technician flows 2–3 PSI of dry nitrogen through the lines to prevent internal copper oxide flaking, while wrapping service valves in wet rags to shield sensitive internal seals from heat damage, following standard Split-System Installation Instructions.
- High-Pressure Nitrogen Leak Testing: The closed circuit is pressurized with dry nitrogen to 150–200 PSIG and held for a minimum of 15 minutes to verify joint integrity.
- Deep Vacuum Dehydration: A two-stage vacuum pump is connected to pull the system down below 500 microns of mercury. The pump is isolated to verify that the vacuum holds below 1,000 microns for at least 7 minutes, confirming that all non-condensable gases and moisture have been completely eliminated.
- Refrigerant Charging & Start-Up: Service valves are cracked to release the stored charge. The system is energized, allowed to run for 15 minutes in high-stage cooling, and final refrigerant adjustments are measured using the sub-cooling method for TXV systems or super-heat calculations for fixed-orifice pistons.
Safe Refrigerant Recovery and Environmental Disposal
Releasing chemical refrigerants into the atmosphere is illegal under Section 608 of the Federal Clean Air Act. When a system cannot be pumped down into its own condenser—such as when moving an indoor coil or replacing leaky line sets—all refrigerant must be recovered using a certified active recovery machine and DOT-approved recovery cylinders.
Modern hydrofluorocarbons (such as R-410A) and next-generation low-GWP refrigerants (like R-454B) operate under significant pressure and require precise handling. Contaminated or mixed refrigerants must be logged, weighed, and transported to an EPA-certified reclamation facility for chemical recycling or high-temperature incineration.
Electrical Safety and NEC Code Compliance
Air conditioning equipment pulls high electrical current during compressor start-up. Adherence to NFPA 70 / National Electrical Code (NEC) standards is non-negotiable:
- Dedicated Disconnect Switch: A weatherproof, readily accessible disconnect switch must be installed within sight of the outdoor unit, no more than 50 feet away.
- Proper Conductor Sizing: Copper conductors must be sized strictly to the Minimum Circuit Ampacity (MCA) stamped on the unit’s data plate.
- Overcurrent Protection: Fuses or HACR-type circuit breakers must match the Maximum Overcurrent Protection (MOCP) rating to prevent nuisance tripping while guarding against winding burnouts.
- Equipment Grounding: A solid, uninterrupted NEC Class 1 grounding pathway must tie the unit cabinet directly to the main electrical panel ground bar.
DIY vs. Professional HVAC Services: Hidden Risks and Warranties
It is tempting to look at an air conditioner and assume it is just plumbing and basic wiring. In reality, residential cooling systems are complex, hermetically sealed refrigeration circuits running under pressures exceeding 400 PSI.
Attempting DIY ac uninstallation and installation routinely results in property damage, severe electrical injury, or total equipment destruction.
| Project Factor | Professional HVAC Installation | DIY / Uncertified Handyman |
|---|---|---|
| EPA Section 608 Compliance | Fully certified; lawful recovery and disposal | Illegal venting risk; federal fines up to $44,539/day |
| Moisture Evacuation | Deep micron vacuum pump (under 500 microns) | Inadequate suction; moisture forms corrosive acids |
| Brazing & Joint Sealing | Nitrogen-purged sil-fos brazing | Soldering failures, scale buildup, rapid gas leaks |
| Manufacturer Warranty | 10-year parts coverage fully protected | Instantly voided without licensed installer invoice |
| Specialized Tooling | $5,000+ in digital manifolds, vac pumps, torches | Inadequate hand tools, improper flaring, line crimping |
Refrigerant Hazards and Structural Mistakes to Avoid
The most catastrophic mistakes made during improper uninstallation and installation include:
- Compressor Acid Contamination: Exposing open line sets to humid air allows atmospheric moisture to react with polyolester (POE) compressor oil, generating hydrofluoric acid that dissolves motor windings from the inside out.
- Improper Line Pitching: Failing to pitch horizontal suction lines slightly toward the compressor traps lubricating oil in low spots, starving the compressor crankcase and triggering seizure.
- Kinked Copper Tubing: Bending copper lines by hand without proper mechanical benders creates internal restrictions, causing high discharge pressures and cooling loss.
- Over-Torqued or Under-Torqued Flare Connections: Stripping brass flare nuts or leaving them loose causes slow, continuous refrigerant leaks that destroy cooling efficiency over several months.
What Is Included in a Standard Installation Service
When you hire a professional HVAC team for system installation or replacement, a standard scope of work includes:
- Site clearing, grading, and placement of a durable composite mounting pad.
- Installation of the outdoor condenser and indoor evaporator/air handler.
- Custom connection of new copper suction and liquid line sets with protective insulation.
- Installation of a new bi-flow or liquid-line filter drier.
- Construction of a code-compliant condensate drain line with a primed 3-inch deep trap and overflow safety float switch.
- High- and low-voltage electrical connections, including whip line replacement and disconnect inspection.
- Nitrogen pressure decay test, 500-micron deep vacuum evacuation, and precision refrigerant charging.
- Thermostat calibration, static duct pressure measurements, and complete airflow commissioning.
- Enrolling the system into scheduled preventative AC maintenance to preserve efficiency year after year.
Frequently Asked Questions About AC Relocation and Replacement
How long does taking down and reinstalling an air conditioner take?
A standard split system uninstallation and reinstallation typically takes between 4 to 8 hours for a two-person HVAC crew. The uninstallation phase takes roughly 1 to 2 hours, covering system pump-down, electrical disconnect, and mechanical removal.
Reinstallation requires 3 to 6 hours because critical steps cannot be rushed—specifically the nitrogen pressure hold (15–30 minutes) and pulling a deep vacuum below 500 microns (often 45 to 90 minutes depending on line set length). If new electrical lines, custom sheet metal plenums, or wall penetrations are needed, the job can extend into a second day.
Can old copper refrigerant lines be reused during reinstallation?
Old copper lines can occasionally be reused, but only if they meet three strict technical criteria:
- Proper Diameter: The existing tube diameter must perfectly match the sizing requirements of the unit being installed (standard residential liquid lines require 3/8″ OD, while suction lines range from 3/4″ to 7/8″ OD).
- Flawless Physical Condition: The tubing must have zero kinks, flat spots, deep oxidation, or hidden pinhole leaks inside walls.
- Chemical Cleanliness: If upgrading from an old R-22 system to an R-410A system, the lines must be thoroughly flushed with specialized solvent flushing agents to scrub out incompatible mineral oils.
Whenever line sets are accessible, installing fresh, virgin copper is always recommended to eliminate contamination risks and protect your compressor.
Is it more cost-effective to repair or replace a disconnected unit?
To decide, use the standard HVAC “$5,000 Rule”: multiply the age of your air conditioning unit (in years) by the total cost of uninstallation, repair, and reinstallation. If the resulting number exceeds $5,000, replacing the unit with a modern, high-efficiency system is almost always the smarter financial choice.
Furthermore, if the unit has already been disconnected, you have already absorbed the labor cost of removal. Applying the remaining labor budget toward a brand-new system guarantees you receive a 10-year manufacturer warranty, advanced SEER2 energy savings, and access to professional heating and cooling solutions that eliminate unexpected repair bills for years to come.
Conclusion
Whether you need an air conditioner carefully uninstalled for a home renovation or need an older, inefficient system retired in favor of modern cooling equipment, the process demands skilled craftsmanship, strict code compliance, and precision refrigerant management. Cutting corners during uninstallation or reinstallation risks electrical shock, costly refrigerant loss, and total compressor failure.
At Nick’s Heating and Cooling, we believe in providing honest, transparent guidance tailored to your home’s unique layout. Our certified, locally-owned technicians arrive equipped to handle every phase of equipment removal, line braze work, and system commissioning. We stand by our work by offering free, no-obligation inspections and clear, upfront pricing without hidden surprises.
If you are planning an upcoming home project or need to explore your cooling options, contact us today to schedule your comprehensive evaluation and discover top-rated professional AC installation and replacement designed to keep your home cool and comfortable through every Alabama heatwave.
Nick’s Heating and Cooling currently services Birmingham, Hoover, Vestavia Hills, Mountain Brook, Alabaster, Chelsea, Homewood, Trussville, Pelham, and Irondale for all your HVAC and Heating needs.